|
Today, we will continue the series comparing the sword and buckler systems of I.33 and Andre Lignitzer. Today’s post will discuss the fourth play from Lignitzer and compare it to cross twenty-five of I.33. As a reminder, I.33 starts each of its 40 plays with a cross in the top left of the image. To compare Lignitzer’s system with I.33, a cross that is most similar to Lignitzer’s play will be selected. If the sixth play in I.33 is referenced, then it will be identified as cross 6. Why Cross 25 Was Selected For ComparisonCross 25 was selected because of the inclusion of a thrust after an attack was made. However, these plays are quite different and we will see later in my analysis why selecting a I.33 comparable play is a challenge when analyzing Lignizter’s fourth play. Comparing Lignitzer Play 4 to I.33 Cross 25
The SimilaritiesThe main similarity between these two plays is the concluding thrust to strike. Both plays use a cut-like action to create the opening for the thrust. However, Lignitzer’s Schaittler appears to be more of a way to pull the opponent’s hands down to create the opening for the thrust as opposed to I.33’s approach to cut from below, then strike while the opponent is retreating or setting up a cut. The DifferencesThis play highlights a foundational difference between the two systems. I.33 does not appear to use a thumb grip to cut at the opponent with a Zwerchau. I speculate that this is primarily because of the separation of the sword and buckler this type of cut generally creates. I.33 would rather the fencer keep the sword and buckler hands close while in the bind to create favorable binds. Because I.33 does not deliver these high cuts, the Schaittler action also does not appear to be explicitly part of I.33. However, the concept of lowering your opponent’s arms with an over bind is certainly highlighted in the I.33 system. In another section of I.33, the fencer is advised to be cautious whenever they are in an under-bind because their head is exposed. The thrust delivered by Andre Lignitzer in this play certainly would fall into this high threat that can occur if the fencer loses the bind. Closing ThoughtsAdmittedly, it was a challenge to find a I.33 play that was similar to this Lignitzer play, more so than the other plays analyzed. The main hurdle is the lack of zwerchau-like images included in I.33. A thrust from an over-bind is common enough but in many cases, I.33 appears to use the shield-strike instead of a thrust when the over-bind is achieved so the connections between these two attacks is also dubious.
This inclusion of the zwerchau in Lignitzer also makes the fourth play the most important when comparing I.33 and Lignitzer. So far, there has been a great deal of overlap in the setup actions for a strike. The main differences seen between the two systems being the concluding actions where Lignitzer will attack the legs while I.33 will not. Now, with the fourth play, we see variation in the binding actions to set up an opening. Next post in the series: Comparing I.33 and Lignitzer: Play V
0 Comments
Today we will continue the series comparing the sword and buckler systems of I.33 and Andre Lignitzer. Today’s post will be discussing the third play from Lignitzer and comparing it to cross nine of I.33. As a reminder, I.33 starts each of its 40 plays with a cross in the top left of the image. To compare Lignitzer’s system with I.33, a cross that is most similar to Lignitzer’s play will be selected. If the sixth play in I.33 is referenced, then it will be identified as cross 6. Why Cross 9 Was Selected For ComparisonCross 9 was selected because of its advice to cut while in the bind. This is one of the core actions in I.33 that can occur when two fencers are bound with their swords high. In practice, this is the bind that occurs when two fencers deliver high cuts to each other or if a fencer cuts into an opponent using halfshield or upper schutzen. The play also includes how to defend against the cut to either the right or the left by advising the fencer to retreat their sword under the arm and then to reach out and strike. This appears to be a similar action to the Wechselhaw (changing cut) that appears in the Lignitzer system. Comparing Lignitzer Play 3 to I.33 Cross 9
The SimilaritiesFrom a I.33 perspective, there is a level of interpretation required to see the flow and similarities between these two plays. In I.33, the fencer from the starting bind can cut to either the right or the left, or to deliver a tread-through from the starting bind. To defend against the cut to the right or left, the fencer moves their word under their arm then reaches out and strike. If this is indeed the Wechselhaw discussed in Lignitzer’s system, then the start of the Lignitzer play is the middle of the I.33 play. However, in the event the I.33 fencer defends against a cut to the left or right from the bind by changing through to attack, the fencers will end in the same bind they started in. The main difference being that the side the fencers are bound on will be reversed from when they started. From there, the fencers again can attack left or right, or perform a tread-through. The art in I.33 depicts a fencer cutting into their opponent’s arms while passing through the buckler. The fencer delivering the tread-through is also illustrated as having their sword and buckler separated while passing to strike the opponent. This appears to be a similar action to “turn uncovered, and push in to the mouth” advised by Lignitzer. The DifferencesBased on the art of I.33, the bulk of the contact with the tread-through appears to be delivered into the opponent’s hands instead of the head, as Lignitzer advises. However, the blade of the fencer delivering the tread-through in I.33 does show their blade past their opponent’s head, which could be the pushing action Lignitzer advises. If this is the case, then the techniques described are similar between the two systems. The main difference is how it is presented, with Lignitzer emphasizing the chaining of attacks, while I.33 emphasizes the variety of options that can occur from the same bind. However, another big difference is the defense against the action, which is similar to what was seen in the analysis of Lignitzer’s second play. I.33 again shows a binding action to defend against the action as opposed to raising the sword and buckler like the opponent does in Lignitzer’s play. However, this is a small difference given the fact that the raising of the sword and buckler defense described in Lignitzer results in the legs being attacked, so it's quite possible binding against the pushing attack is advisable in both systems to avoid the following action. Closing ThoughtsBoth systems recognize the attacks that can be done after a bind has taken place. While I believe the other plays in I.33 generally move away from cuts after the bind, instead favoring to secure the opponent’s sword with binding actions to hit the opponent, there is no doubt that cuts from the bind are prevalent in I.33. The difference in these two systems for the plays analyzed today appears to be the different approaches the two sources take in sword and buckler combat. While I.33 shows the options that can occur from this bind, resulting in overlap with Lignitzer, Lignitzer takes this idea to the next level by showcasing a string of actions that can be used to create openings against the opponent.
Next post in the series: Comparing I.33 and Lignitzer: Play IV Book Review: I33 Fencing in the Style of the Walpurgis Manuscript 2nd edition By Andrew N. Kenner3/10/2024 Today, we will be reviewing Andrew N. Kenner’s book titled I33 Fencing in the Style of the Walpurgis Manuscript 2nd edition. This book covers their interpretation of the I.33 techniques and with the second edition being published in 2016 . I will primarily focus on the book’s value as an interpretation source for new fencers getting started with I.33. I will focus on three major areas: structure, presentation of techniques, and value. I will not comment on the interpretation itself. The validity of the interpretation is up to the reader to decide as they journey down their own research on I.33.  StructureKenner begins his book with a forward on the history of the manuscript and its system. He then goes on to discuss equipment for the system as well as foundational swordsmanship concepts like distance management. The I.33 technique starts by introducing the stance in I.33 and highlighting keeping the sword and buckler hands close while performing the binds in the system. The second chapter introduces the attacks and defenses of I.33 which captures the overall strategy of the manuscript. Next, the manuscript covers movement in the system followed by binding and some additional techniques. The later chapters of the book group the wrestling, grappling, and special techniques of I.33 into a single chapter. The book also includes a handful of exercises throughout to help the reader practice the techniques discussed in the section where the exercises are. The structure of the book does an excellent job slowly building up the techniques and organizing the techniques of I.33. The techniques are grouped logically to introduce a ward, then introduce the counters to it. The wards are also further decomposed into high wards and low wards which helps the reader build towards getting a complete picture of the techniques. Presentation of TechniquesOne of the best aspects of Kenner’s book is the bolding of key phrases such as “Vidilpoge” when they are discussed. This allows for techniques to quickly stand out while the reader flips through the pages and enables them to focus on the techniques from the source. The book also features a number of pictures to help the reader visualize what is being discussed. Furthermore, while the fencers in the pictures are wearing period clothing of I.33, they tuck their tunics similarly to what is shown in I.33. This allows the readers to get a better idea of what the fencer’s feet and leg posture are, which further enhances the ability for the reader to learn from the book. 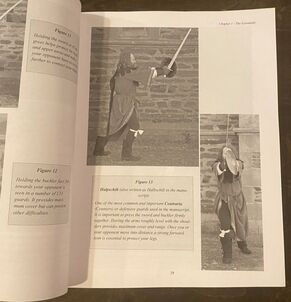 ValueAs of writing this blog, Kenner’s book is available for around $22. It is soft-covered and has durable pages that help when reading and practicing at the same time. This makes it one of the most affordable interpretation books available on I.33. Who I Recommend it toThis is an excellent book to start off with. I.33. The techniques discussed are straightforward, and the visuals provide further clarification to the reader. While the techniques are not in the order they are presented in I.33, the bolding of terminology and the images do a decent job of associating Kenner’s interpretation to the manuscript. When paired with a translation of I.33, this book can serve as an excellent guide when someone begins their journey into I.33.
|