|
Today, we will be reviewing Bettina Miriam Sehner and Michael Lammer’s book Ultima Custodia, which was published in 2023. This book covers their translation and interpretation of the I.33 techniques and features custom art by Bettina Sehner throughout. I will primarily focus on the book’s value as an interpretation source for new fencers getting started with I.33. I will focus on three major areas: structure, presentation of techniques, and value. I will not comment on the interpretation itself. The validity of the interpretation is up to the reader to decide as they journey down their own research on I.33. Please note, I interviewed Sehner late in 2023 to help promote her book. While I purchased the book myself, I am certainly grateful to Sehner for taking the time to interview me. While I believe my review is objective, it is worth pointing out any bias I may have regarding this book.  StructureThe book is broken up into two major focuses. The first is the history of the manuscript and their translation. The second part is their interpretation of the techniques. For the interpretation section, the authors introduce the equipment for learning I.33 and the geometric basics of sword fighting, such as the center line and angles of attack. Next, the wards are introduced, including footwork and other fundamentals of swordsmanship. The interpretation section then covers the counters to the wards and specific attacks in the manuscript. Presentation of TechniquesThe translation section of I.33 includes the images of the manuscript itself which is an incredible inclusion in this book. While this does mean that there is a fair amount of white space in the book, the translations are shown with the page they are from which makes it easy to follow for a reader unfamiliar with I.33. The interpretation section includes descriptive text as well as images to support their descriptions. It also includes three-dimensional renderings of the I.33 technique to add depth to the otherwise two-dimensional art of I.33. 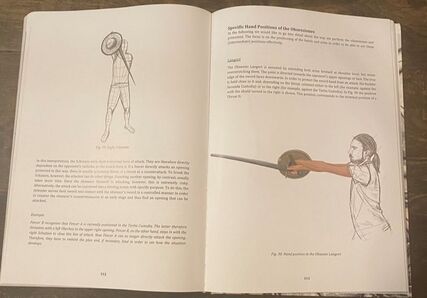 ValueAt the time of writing this blog, the book can be purchased at bladenswords.com for about $60. Because this book is a custom project of the site, you must submit a form to order it. While pricier than other interpretations on the market, the book is also hardcover and in color. This color is critical because the book also includes artwork from Sehner which makes the book also an art book, not just a translation and interpretation book. One negative I do have with the book is the purchasing process. Many potential readers may be hesitant to purchase from their site, especially given the cost of the book. However, I purchased my copy of the book this way and had it damaged and lost during shipping. Blade and Swords promptly responded to the issue and re-shipped me a new copy without additional charges. I believe they have also improved their packaging process since then to reduce the chance of that occurring again. Many others have received their copies of the book as well which speaks to the safety of the purchasing process. Who I Recommend It ToThis book is a great I.33 primer book for anyone looking to start their journey into I.33. While on the more expensive side for interpretations, it also doubles as a work of art that can be displayed on coffee tables and around the house. Furthermore, one of the things that forces the book to be more expensive is their inclusion of the pages of I.33, which requires royalty fees to be paid to Royal Armouries. Very few interpretation books doubles as a translation book. If you include the cost of a translation book of I.33 and the cost of a soft-covered interpretation book, you will pay around $60, which helps put into perspective the value of this book.
0 Comments
Today we will be reviewing book titled Sword Fighting 2: An Introduction to the Single-Handed Sword and Buckler by Herbert Schmidt. This book covers Schmidt’s interpretation of a number of sword and buckler systems including I.33. The book was originally published in 2015. I will primarily focus on the book’s value as an interpretation source for new fencers getting started with I.33. I will focus on three major areas: structure, presentation of techniques, and value. I will not comment on the interpretation itself. The validity of the interpretation is up to the reader to decide as they journey down their own research on I.33.  StructureSchmidt begins his book with an introduction to the history of sword and buckler and general characteristics of the weapons. He also takes this time to introduce the main sword and buckler sources he will focus on, namely Andre Lignitzer, I.33, Talhoffer, and Paulus Kal. Next, the book covers general principles such as how to hold the sword and the bucker, the poster the fencer should use, binding actions, distance management, and footwork. The fifth chapter of the book includes the terminology and definitions for actions included in I.33. The following chapter includes the attacks and binding actions I.33 uses to strike the opponent safely. Next, each play in I.33 is shown and grouped by the ward they utilize. The later chapters of the book use a similar structure for teaching Talhoffer, Paulus Kal, and Lignitzer. The chapters start with terminology then expand into the plays for those systems. Presentation of TechniquesThe book includes images, text, and blocks of notes to add emphasis for specific details to the reader. The pictures are in black and white (which is common for interpretation books), and the fencers are wearing gambesons that do not mask the body mechanics they are using. The pictures were also clearly taken in a photo room, allowing all of the image detail to be on the fencers without a distracting background. The book's layout is excellent for introducing the techniques and sources Schmidt is interpreting. At all times, it is clear to the reader what source they are learning about and how it relates to the original sources. As a bonus, Schmidt includes an appendix that summarizes the wards and what they are countered by to help the reader quickly remember specific techniques. 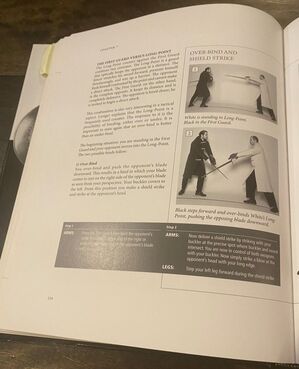 ValueAt the time of writing this blog, Sword Fighting 2: An Introduction to the Single-Handed Sword and Buckler can be purchased for around $40. While pricier than other interpretation books currently on the market, Schmidt’s book is also hardcover with durable pages which makes the book itself also aesthetically pleasing. Who I Recommend It ToThis is one of the most helpful books I have found on sword and buckler combat and it was foundational to me starting my journey into I.33. While the book is not explicitly a I.33 interpretation book, the book does an excellent job clearly explaining techniques. This is an easy book to recommend, not just to I.33 fencers, but to fencers interested in learning about the wider world of medieval sword and buckler systems
Today, we will be reviewing Paul Wagner’s and Stephen Hand’s book titled Medieval Sword & Shield: The Combat System of Royal Armouries MS I.33. This book, published in 2003, covers their interpretation of the I.33 techniques. I will primarily focus on the book’s value as an interpretation source for new fencers getting started with I.33. I will focus on three major areas: structure, presentation of techniques, and value. I will not comment on the interpretation itself. The validity of the interpretation is up to the reader to decide as they journey down their own research on I.33.  StructureWagner and Hand start their book with basic gear for training as well as fundamentals of swordsmanship, such as distance and footwork. They then move into fundamental concepts of I.33, such as the wards and the counters to the wards. The book then discusses the actions that can be performed from each ward, starting with the first one and ending with the more advanced wards. The book also includes a conclusion and a summary of the following steps to continue on your journey to understanding I.33. I believe this structure works for teaching I.33 and gives a ward-first perspective into the techniques. The organization inherently emphasizes footwork first, which is incredibly important in swordsmanship, regardless of the weapon. Unfortunately, when the techniques are grouped by ward, it can be a challenge for newer fencers to relate what they are reading in the interpretation to the manuscript itself. However, this is mitigated by the fact that Wagner and Hand include a large number of images, which can help fencers relate what they are learning to the manuscript. Presentation of TechniquesUnfortunately, while the images in the manuscript help the reader relate to the manuscript, they also mask some of the techniques and body mechanics. This is because Wagner and Hand chose to wear baggy tunics, as depicted in I.33. The authors do address their rationale for this choice. They believe it is critical to interpret the techniques in the clothing of the time because clothing, especially footwear, can impact technique. I fully support Wagner and Hand's sentiment, but the tunics mask their body movements, which can lead to challenges in replicating their techniques. One advantage these images do have is the way in which they were taken. The pictures were taken in a clear field with a simple background which makes it clear what to focus on when analyzing the images in the book. The quantity of the pictures and how they are laid out in the book alongside the text also makes it very easy to follow the rationale and flow of their interpretation. 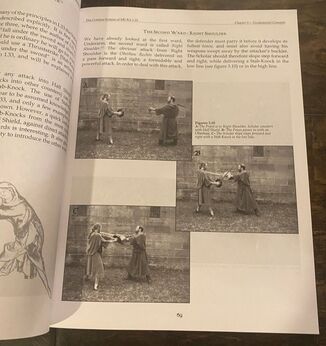 ValueThis book can be found for around $50.00 used when writing this blog. It does not appear that this book is still in print, which means the price will continue to increase. The book has a soft cover but a thick binding, which helps preserve the book. The book is a quality soft-cover book, and the weight of the pages adds both durability and ease when trying to study from the book and then practice the techniques. Who I Recommend It ToUnfortunately, this is a difficult book to recommend to new fencers due to the difficulty in finding affordable copies. There are other books currently in print that can be used to start learning I.33. However, this book is one of the earliest HEMA I.33 interpretations and is a great book to have in your collection if you’re interested in the evolution of I.33 interpretations. It is clear that Wagner and Hand put a large amount of effort into their interpretation and the book they produced is clear and concise when presenting their interpretation of I.33.
|