|
There are many ways to prepare for Historical European Martial Arts (HEMA) tournaments. Competitors may study from manuscripts and other historical sources in order to learn swordsmanship. These types of competitors can range from people that dedicate themselves to a single system to others that pursue a general study of multiple systems to understand a weapon as a whole. However, studying treatises is not the only way competitors prepare for HEMA tournaments. Others put more emphasis on the physical aspect of tournaments and swordsmanship. They may also take a trial and error approach to learning techniques and tricks that work to aid them in a tournament. At one extreme, the competitors who study the manuscripts bite their thumb at those that ignore the sources. On the other extreme, the competitors who focus on the physical aspect believe that treatises are limiting and prevent fencers from adapting in a fight. Today we will begin a two part series on the advantages, and disadvantages, of studying treatises to prepare for HEMA tournaments. Structure The first and most useful advantage swordsmanship treatises provide is structure. A treatise contains a series of actions, vocabulary, definitions, and other teachable objects that allows for everyone studying the treatise to speak the same language. In the case of British military sabre systems, this is demonstrated with numbered cuts and sequenced plays. (Roworth, 1824) In the case of I.33, it is the terminology and plays that help illustrate techniques to perform. (Manuscript I.33, Early 14th Century (2018)) In Meyer’s longsword system, the sword actions are named to help assist in understand ways the longsword can move. (Meyer, 1570 (2015)) Even loosely structured systems like George Silver’s system contain terms like variable, open, and guardant to define how a fencer is to conduct themselves in different scenarios. (Silver, 1599) 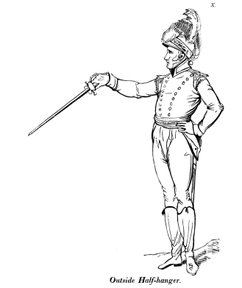 An example guard from The Art of Defence on Foot by Charles Roworth, 1824 This allows for competitors preparing for a tournament to communicate specific techniques effectively and to connect with a larger audience of competitors who also use the treatises to learn swordsmanship. Being able to learn and practice with a larger audience who can reference specific terms and techniques helps grow competitors in their journey in learning swordsmanship. Learning from the Past Another advantage to studying treatises is the ability to learn from the past. In many cases, the treatises come from a history of learning from prior masters which continued to develop and refine what they believed to be the proper way to use their respective weapon. For the Bolognese sidesword and buckler system, Achille Marrozo and Antonio Manciolini learned from the Dardi School of Fencing. (Wiktenauer, 2021) For German longsword sources, there is an entire lineage of sources developed in the Liechtenauer Tradition. (Wiktenauer, 2022) Specifically for the Liechtenauer tradition, the Fellowship of Liechtenauer listed in Paulus Kal’s manuscript contained seventeen individual names that were involved with the development of the system as a whole. Later, Joachim Meyer would continue the Liechtenauer tradition adding even more literature to study and learn from. 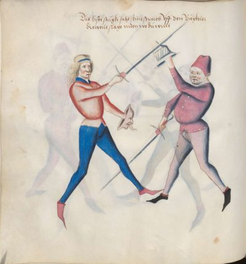 Paulus Kal in a 1470 mansucript, illustrating a technique discussed in previous manuscripts dating back to 1452. Even in the cases where there is not a clear lineage like I.33, competitors can learn from the lessons that are taught. These treatises serve as a way at least one person believed a sword should be used. By studying these treatises, modern competitors can learn what worked, and did not work, from previous fencing masters. Closing ThoughtsStudying treatises as described in this blog post is not just reading manuscripts. Drills, peer reviews of techniques, practice, sparring, and other tangible activities are all required to properly study a treatise. However, with practice and a scholarly approach to learning treatises, a fencer can learn to become a competent competitor in HEMA tournaments. There is no doubt in my mind that given enough trial and error, HEMA tournament competitors could re-create the systems written in the treatises. However, by studying the treatises, HEMA tournament competitors can immediately learn practical techniques which can take a bit of the guess-work out of learning swordsmanship. ReferencesManuscript I.33.(Early 14th Century (2018)). (D. J. Forgeng, Trans.)
The Medieval Art of Swordsmanship: Royal Armouries MS I.33 Meyer, J. (1570 (2015)). The Art of Combat. (D. J. Forgeng, Trans.) Roworth, C. (1824). The Art of Defense on Foot with Broad Sword and Sabre. Silver, G. (1599). Paradoxes of Defence. Retrieved from http://www.pbm.com/~lindahl/paradoxes.html Wiktenauer. (2021). Filippo Dardi. Retrieved from Wiktenauer: https://wiktenauer.com/wiki/Filippo_Dardi Wiktenauer. (2022). Johannes Liechtenauer. Retrieved from Wiktenauer: https://wiktenauer.com/wiki/Johannes_Liechtenauer
0 Comments
While sparring, many people wear lighter gloves on their buckler hands because of the natural protection the buckler provides. For me, I prefer to wear rapier gloves while sparring because it adds hard protection over the knuckles while also providing padding over the fingers and forearms. However, there are situations while sparring that can put your fingers at risk. Today we will be discussing my personal injury I suffered on my buckler hand. Hopefully through discussion, others can avoid injuries as we all work towards making historical fencing a safer activity. Warning, this post will contain injury images and videos that may not be suitable for all viewers. What Happened?While sparring sword and buckler, my opponent delivered a high cut while I retreated. I extended my buckler up to defend while backing away. This is a technique that is common in sword and buckler sparring and is an advised technique in a number of systems such as Lignitzer and Kal. Furthermore, this is a technique that I have safely executed hundreds of times while sparring. Unfortunately, my opponent’s sword struck the middle of the interior top portion of my thumb instead of my buckler. At first, the injury did not seem too serious. I had full range of motion in my thumb and I could make a fist without any sharp pain. I iced my thumb at practice to try and reduce the swelling and expected to have a bad bruise the next day. The following day when the swelling had reduced, I noticed more localized bruising. My thumb was cold to the touch and I could not move the top part of my thumb without discomfort. 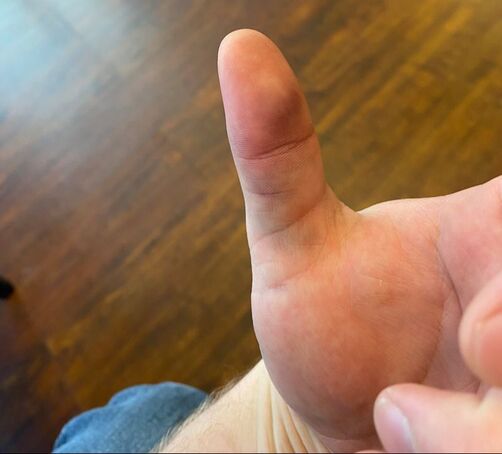 Injury Report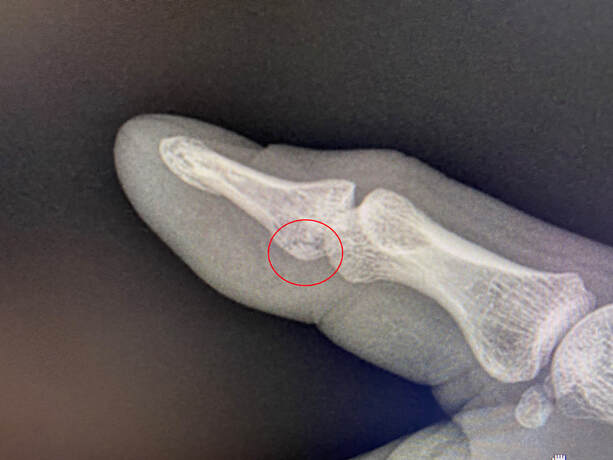 Urgent care diagnosed me with a broken thumb. After a follow on appointment with an orthopedic, it was determined that I had suffered an avulsion fracture in the top bone of my thumb. Minimum Weeks of Recovery: 6 Method of Treatment: Temporarily placed in a splint until a custom fitted brace is available to immobilize the thumb. No surgery required. 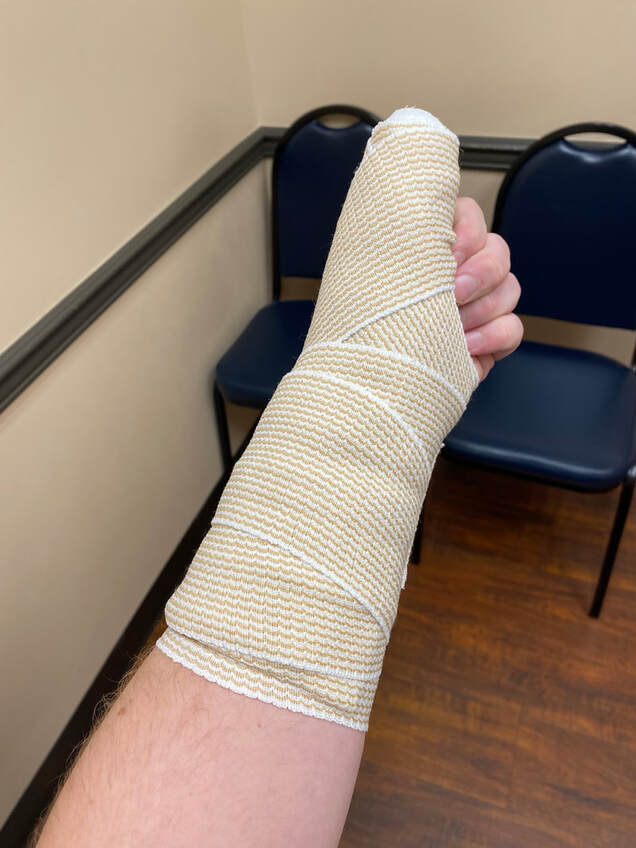 Gear ChangesGiven that the impact hit the interior top portion of my hand, adding finger caps to my gloves seems like a reasonable upgrade to add more safety. However, rapier gloves may be insufficient when sparring with broader bladed swords like medieval arming swords. Medium level protective gloves like Lacrosse/Hockey gloves with hard plastic or Red Dragon Sparring Gloves with added finger caps would add more protection for my off hand. While the Red Dragon Sparring Gloves seem over-protective for synthetic sparring, and under-protective for steel sparring, they may be the right level of protection when paired with a buckler. This level of protective gloves do not work with all bucklers when trying to perform I.33 techniques. The solution to this is to use bucklers with wider handles to allow for the gloves to fit while still having the dexterity to move the buckler from side to side to defend. 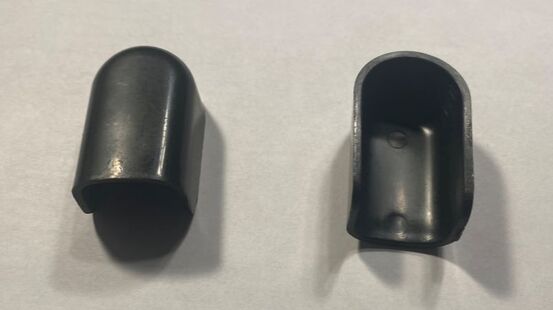 Technique ChangesWhile gear is the primary way to spar safely, good technique is also critical in ensuring safety. After further inspection of the video, this high buckler defense I performed was not the same as ones I had done before. My arm was not fully extended to provide the maximum cone of protection. My hand also appeared to open slightly which made the buckler angle more towards the left side creating a bigger gap on my right side. It appears that my buckler not being at the right place at the right time was one of the major issues that resulted in this injury. When defending with the buckler, many images in manuscripts clearly show the buckler fully extended away from the body to maximize defense. From a I.33 perspective, the protections may also be key. The protections allow the fencer to safely defend against attacks while keeping the sword and buckler hands together. This would have allowed for my heavier, more protective, glove on my sword hand to also cover the buckler hand. It also would allow for the sword to provide active defense as opposed to just relying on the buckler for protection. Closing ThoughtsInjuries happen in martial arts. We try to avoid them as much as possible. Unfortunately, it is not an “if they happen” but a “when they happen”.
Do not take safety for granted when participating in historical fencing. Even when using a round steel dish to protect a hand, one poorly executed technique can sideline you from activity for weeks. Learn from yours and others injuries and let’s continue to promote safe sparring in the HEMA community. 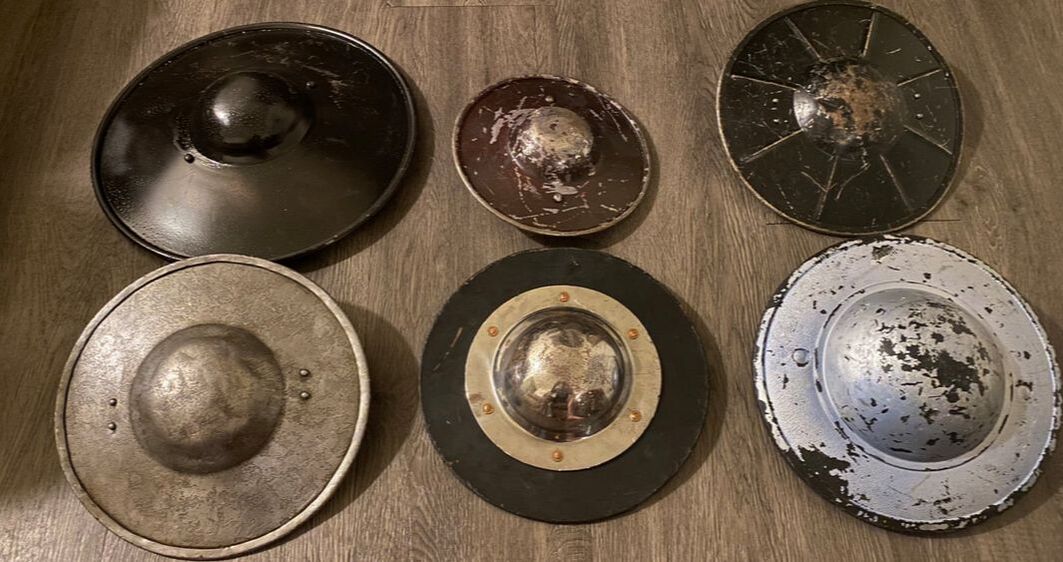 Buying any type of gear for the first time can be a bit overwhelming. Makes, models, function, purpose, style, durability, price, and many other factors can make it difficult to know if your purchase is right for you. Everyone has different expectations for their gear. Today I would like to discuss characteristics of bucklers I observed to hopefully make your first purchase easier. This is less of a recommendation for THE buckler for everyone and more of a list of observations I have on types of bucklers. To simplify the variation a bit, I am only going to discuss round bucklers today. Material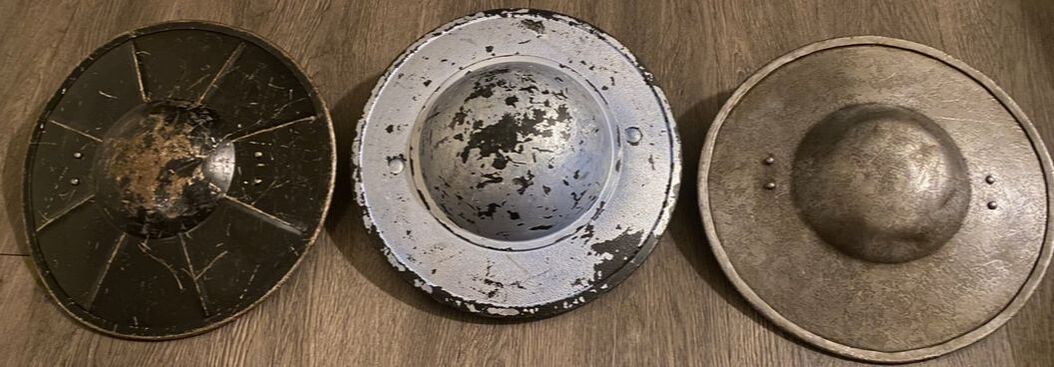 14 gauge steel bucklers are arguably the most durable bucklers on the market due to the sheer thickness of the metal. The lower the gauge, the thicker the steel. Unfortunately, a 14 gauge steel buckler can feel a little slow and heavy in the hand due to the thickness and weight. One advantage to the weight and thickness is that when the buckler is struck with a sword, the buckler does not move nearly as much in the hand. This gives the fencer one less thing to think about while sparring because the fencer does not have to think about re-gripping the buckler after a strike. For me, it feels like my opponent’s sword bounces off the buckler after impact instead of the other way around. 16 gauge steel bucklers are a lighter and fairly durable option for a first buckler. While they are not as thick as their 14 gauge counterparts, the 16 gauge buckler does offer a light and quick feel for a buckler. While these bucklers likely will not last forever, they still will carry fencers through plenty of fights. Because the metal is thinner, it is not difficult to hammer and reshape the buckler to get a few more fights out of them too. 16 gauge bucklers seem to be the most popular in HEMA and have the most variety for purchase at this time. Polypropylene bucklers offer an incredibly durable and near zero maintenance option for your first buckler. To counter steel swords biting into the buckler and taking chunks out, these bucklers come thick so they can take a beating. Polypropylene bucklers are also fantastic options for fencers that are largely using plastic sparring swords since steel bucklers can damage plastic swords. Unfortunately, there are not many options for polypropylene bucklers on the market right now so if there are other features of these bucklers that are less ideal for you then you may have to pass on this option. Leather or wooden bucklers add an interesting dynamic to the sword and buckler fight. They do not take direct impact as well as steel bucklers which forces the fencer to perform more parrying motions with the buckler. Unfortunately, because of the cost of wooden or leather bucklers, I cannot recommend them to a first time buckler buyer. While they add variety to the sword and buckler fight, they just are not as durable as the buckler material types mentioned above. For a first buckler, I recommend a buckler that is more durable to give you time to warm up to the feeling of the buckler in your hands. Grip Type 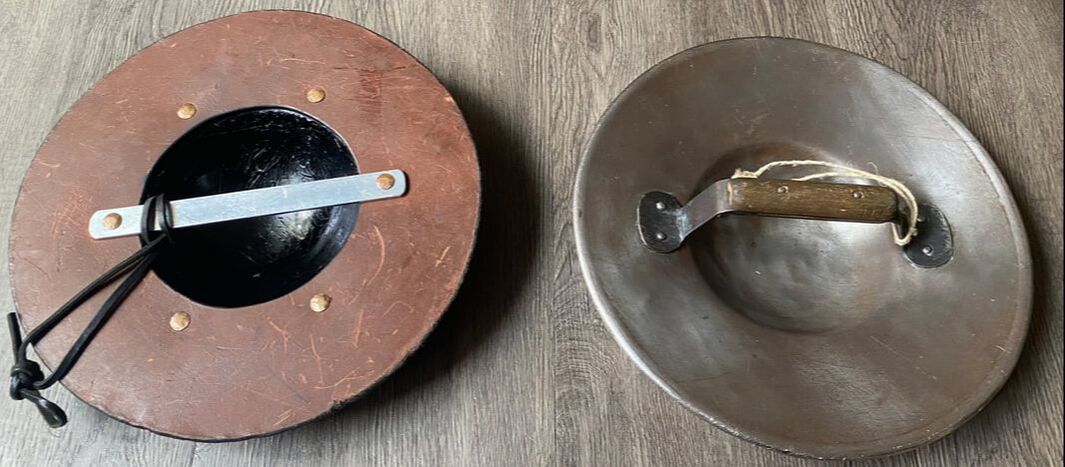 U shaped Grips are probably the most common grip types for bucklers. The U shaped grip allows for room between the handle and the boss for bigger hands and heavier fencing gloves. In some situations, these grips can be raised too high leading to the buckler rotating in the hand on impact. However, I have not experienced this problem with any of the bucklers I have purchased. Just be aware of how high the grip seems raised when you compare your potential purchase to other bucklers. Bar Grips are the less common presently but more historically common buckler grip options. Bar grips can be surprisingly effective since the grip is closer to the true center of balance of the buckler, reducing the chance of the buckler rotating in the hand. However, bar grips can be restrictive for people with bigger hands or while wearing fencing gloves. Another word of caution is that some bar grips are so thick that the buckler feels less secure in the hand resulting in difficulty gripping during defensive actions. Some people also do not like thinner bar gripped bucklers because they feel they need to hold the bar too tightly to keep it secure. This issue can be mitigated by adding some grip tape or twine rope to increase the thickness for a more comfortable grip. Fastener Position 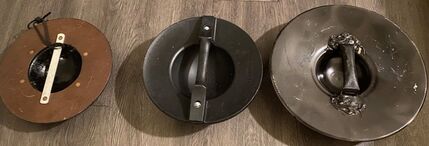 Single point fasteners use one fastener on each side of the grip to secure it to the buckler. Single point fasteners for U shaped grips seem to quickly lead to rattling and loose handles. To get the most out of this fastener type, I recommend securing the grip to the buckler with some epoxy. I have not experienced rattling grips with my bucklers that have an excess amount of epoxy applied to them. For flat bar grip bucklers, single point fasteners seem to get the job done and keep the grip nice and secure without assistance of an adhesive. 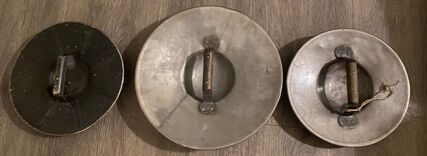 Horizontal two point fasteners have the two fasteners running perpendicular to the direction of the grip. This has proven to be a resilient configuration for the fasteners that has kept the grips on my bucklers secure. I have yet to need to epoxy the grip on these bucklers. For U shaped grips, I highly recommend this type of fastened grip on your buckler. Vertical two point fasteners bucklers have the grip secured with fasteners that are parallel to the grip. I honestly have never tried using a buckler with this design due to the fact that I think they will lead to the same loose handle issue that a single point fastener would have. When I hold a buckler, the grip faces perpendicular to the ground leading to many strikes coming from the sides. This makes me think vertical two point fastener grips will just become loose on the buckler like a single point fastener. If anyone has first-hand experience with these types of bucklers, I would love to hear your thoughts! Size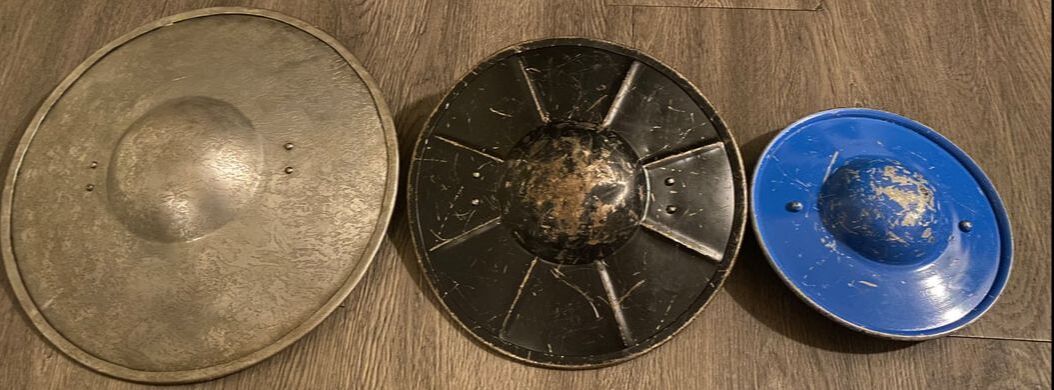 For the buckler sizes, these are generally observations of the 3 most common buckler sizes. Generally, I have found that these observations apply for every buckler size in between if you pick the closest size below. 9 inch bucklers are fun and awesome bucklers that help hammer in the principles of good sword and buckler combat. HOWEVER, they are small and can be frustrating to learn with as a first buckler. If you want a challenge while fencing, the 9 inch buckler is awesome! If you want a buckler that will be easier to use for competition, training, and sparring, you may want to look at getting a bigger buckler. If you are an instructor, I highly recommend having a pair of 9 inch bucklers to bust out for your students to up the difficulty level. Nothing shows a fencer that they are relying on the buckler instead of the sword for their primary defense quite like a 9 inch buckler. 12 inch bucklers are great bucklers and generally considered the standard for HEMA. They offer a buckler that is large enough to cover most hands with gloves on, while also being small enough that most if not all sword and buckler techniques from all systems can be performed. 12 inch bucklers are always tournament legal and are very easy to find wherever you are shopping for bucklers. 15 inch bucklers are the largest (mostly) tournament legal bucklers out there. They are great defensive measures and really can make buckler defense easy. Unfortunately, a fair number of tournaments ban bucklers over 14 inches. Another drawback for 15 inch bucklers is their weight. I have also observed that for I.33 sword and buckler techniques, 15 inch bucklers seem to get in the way of quick strikes from the wrist during a bind. That being said, for larger fencers, 15 inch bucklers may be just fine for them. For basket hilted sword and buckler combat, I always try to compete with a 15 inch buckler. Closing Thoughts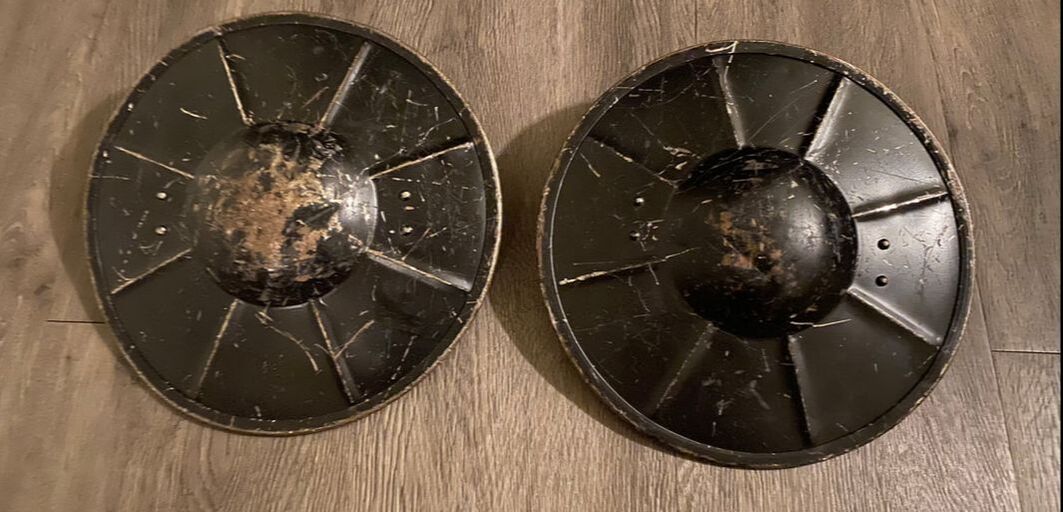 A 16 gauge buckler after a year of sparring vs. a few months of sparring For me, I prefer a 14 gauge, U shape gripped, horizontal two fastened, 12 inch buckler. For others, they may prefer 16 gauge because of its light agile feel. The choice is up to you and is different for every person. At the end of the day, your first buckler will likely not be the perfect buckler for you. As you learn and grow as a fencer, your likes and dislikes with types of gear will change. My hope is that my observations above can help you make a first buckler purchase that you can be happy with.
|